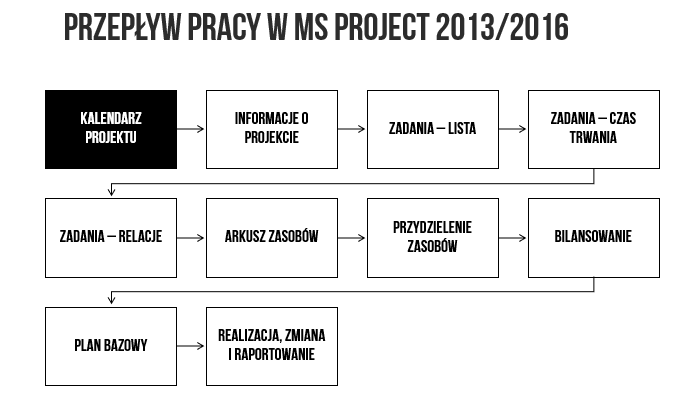
MS Project can be a useful and, importantly, friendly work tool. While conducting training in this area, I noticed that especially the second statement raised doubts among the participants. Apart from the reluctance to change, leave the comfort zone and try a new tool, it often results from bad experiences and/or habits. And in fact, if we do not stick to certain rules or work stream, we may feel that we have worked hard and the effect is not satisfactory. Bah! It may even look wrong, e.g. tasks are carried out on dates or times when nothing should be happening.
Below I will try to explain what workflow to follow to achieve the desired effect and ultimately save yourself frustration.
1. Project calendar
Before you start working on tasks, allocating resources and tracking workload, it's worth creating a work environment where all this will take place. The first of two steps is to create a project calendar reflecting the dominant way (time) of work of tasks and resources, e.g. Monday to Friday, 8:00 a.m. to 4:00 p.m. In this way, tasks on the schedule will be performed only when actually possible. There is nothing stopping you from creating unique calendars for unique resources or tasks - remembering that they also need to be assigned to them. Is there a machine that is only available to us on Fridays? Or does the consultant work on Tuesdays and Thursdays from 9:00 a.m. to 2:00 p.m.? No problem! Since we have information about the availability of resources, we can include it in dedicated calendars.
2. Information about the project
We determined, as part of the step above, when work could be performed on our schedule. Now it is worth making sure that our calendar is actually assigned to the project. Additionally, you need to indicate when the project starts (or ends, if you use backtracking). These elements are the second and last step in preparing the work environment.
3. Working on tasks – list, duration and relationships
Take the effort you put into creating the WBS with your team and prepare a task list. Consider what summary tasks you need to tie together fragments of work, ending with a common effect. Where should the milestones be? What unit of time should be adopted and how long should individual tasks take? Maybe it's worth using the PERT method? Assign the duration of tasks, without imposing their start and end dates, if possible - these will be calculated themselves based on the connections between the elements. Finally, combine all tasks - except summary tasks - into a logical structure, so that everything starts at the start milestone and ends with the end milestone. Apply advances or delays, change the types of relationships between sentences where necessary, resulting from external conditions or possible, resulting in schedule optimization. At the end and at the very bottom of the task list, add recurring tasks. In this way, you have defined the project workflow, checkpoints, its duration - the first elements of the project baseline and the critical path.
4. Resources – resource sheet and their allocation
Now that the scope and time aspects have been pre-defined, it's time to consider what resources will work in our schedule? People and machines are work-type, reproducible resources. Materials are everything you will use once. The cost is the budget for orders, e.g. for a graphic designer. To assign them to tasks, you must first enter them in the resource sheet. Here you can also assign them dedicated calendars or plan holidays/technical breaks. Once the resource sheet is populated with data, you can start allocating contractors, machines, tools, materials, and budgets to tasks in the schedule. From this moment, we will obtain information about the planned workload and costs of the tasks performed - another element of the project's baseline plan.
5. Balancing and project baseline plan
It's time to put all the added elements together. Probably after assigning resources, some of them are overloaded and the schedule needs to be balanced - on the one hand in terms of resource availability, and on the other hand, taking into account the constraints imposed on the tasks. You can use automatic resource leveling, but you need to audit what the algorithm has done. Some solutions will be right, others we won't want to keep. Therefore, I suggest treating automatic balancing as a hint and making conscious decisions yourself. Once we've gotten rid of the resource overload and have achieved the workflow model we'd like to run the project with, it's time to save the baseline. This is where all actual data (duration, start and end dates of tasks, costs) will be calculated and added to the schedule, and on this basis it will be possible to report performance compared to the plan.
6. Implementation, change and reporting
The program has clear and comprehensive built-in reports. However, the information presented on them will only be as good as the data on the work actually performed - this is where the tracking table view will come in handy. We can track any time deviations on an ongoing basis on the appropriate Gantt chart. Design changes can be incorporated by overwriting an existing baseline or creating intermediate plans.
This is a general workflow applicable to MS Project 2013/2016. Do you have a different point of view or practice? I invite you to comment and discuss.
Want to learn more? I invite you to our training in the practical use of MS Project 2013/2016!
Author: Łukasz Lipski


